888-450-3725
In this article
Packaging design dimensions for better product presentation: safe zones, bleed, print faces, and layout tips that lift shelf pull and unbox delight. At Discount Box Printing, we make custom packaging boxes to any size, factory-direct across the United States. This guide covers sizes, tips, and cost points so you pick right the first time.
What are packaging design dimensions?
Packaging design dimensions cover the flat dieline, the bleed (1/8 in past every cut), the safe zone (1/4 in inside every fold), and the print faces that show on shelf. A great box design plans all four before art starts. At Discount Box Printing we make any size factory-direct from $0.10 per unit. Beat any box quote.
- Bleed: 1/8 in past every cut edge
- Safe zone: 1/4 in inside every fold
- UPC panel: 1.5 × 1 in min
- Hero face: largest visible panel
- Fold lines: keep bold text off
- Resolution: 300 DPI minimum
- Color mode: CMYK for print
- File type: PDF (with fonts embedded)
Start With the Dieline
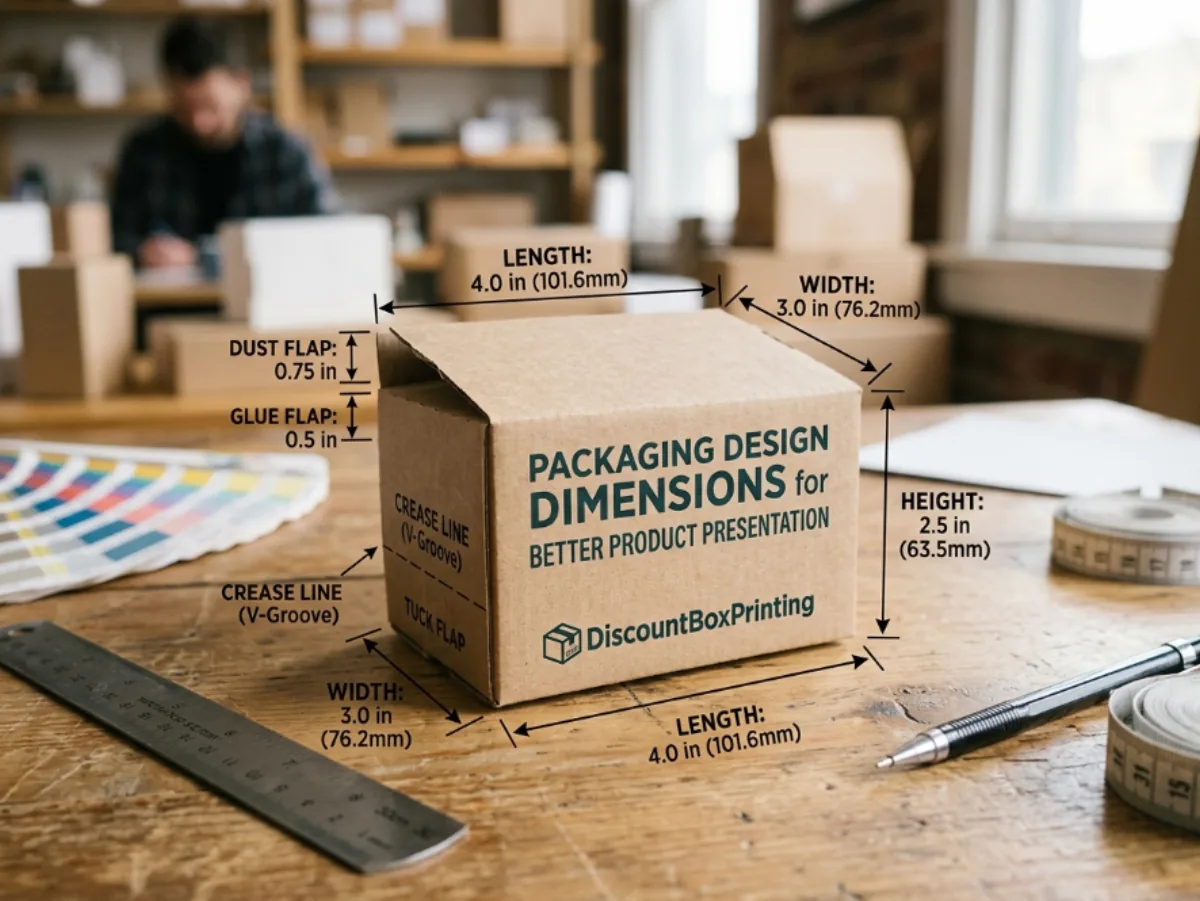
A dieline is the flat drawing of the box before it folds. Solid lines are cut edges. Dashed lines are fold creases. Print art sits on the dieline in the exact position that shows once the box is assembled. Always design on the dieline your supplier sends, not a generic template.
Bleed and Safe Zones
Bleed is 1/8 in of print past every cut edge, in case the die shifts 1/32 in during production. Safe zone is 1/4 in inside every fold, where text and key art stay clear of the crease. Skipping bleed leaves a white edge. Ignoring the safe zone hides text on the fold.
Planning the Hero Face
The hero face is the largest visible panel on shelf. For a tuck-end retail carton, it is the front face when the item stands vertical. For a mailer, it is the top face. Put the brand mark, product name, and key claim on the hero face. Save ingredient lists and legal text for the side or back.
UPC and Legal Panel Placement
Reserve a 1.5 by 1 inch panel for the UPC on a back or side face. Never place UPC on a fold. Keep 1/8 in quiet zone on all sides of the barcode. Put ingredient lists, warnings, and net weight nearby. Cosmetic and food cartons have strict FDA panel rules.
Print Resolution and Color Mode
All raster art (photos, textures) needs 300 DPI minimum at print size. Vector art (logos, icons) prints crisp at any size. Convert all colors from RGB to CMYK before export — RGB colors shift on press. For brand-critical colors, spec a Pantone match.
File Formats and Export Rules
Export as press-ready PDF with fonts embedded, bleed included, and crop marks on. Include the dieline as a spot color layer that prints suppress at press. Send a JPG preview so the print team can visually confirm before ink hits paper.
Common Design Mistakes on Packaging
Missing 1/8 in bleed and getting a white edge on cut. Placing bold text across a fold line. Using RGB colors that shift on CMYK press. Missing UPC quiet zone and blocking the scan. Under-resolution raster art that prints pixelated on the hero face.
Sizes & Dimensions Chart
Design dimension standards for print-ready packaging art.
| Use case | Popular Size (L × W × H) | Best Fit |
|---|---|---|
| Bleed | 1/8 in past every cut | All box types |
| Safe zone | 1/4 in inside every fold | All box types |
| UPC panel | 1.5 × 1 in min | Retail cartons |
| Quiet zone (UPC) | 1/8 in around barcode | Retail cartons |
| Raster resolution | 300 DPI at print size | Photos, textures |
| Color mode | CMYK (not RGB) | All print art |
| File format | PDF with fonts embedded | Press-ready export |
Wholesale Cost and Ordering
Custom sizes cost the same as stock sizes in bulk. So there is no reason to force an item into a poor fit. We make the boxes ourselves, which means no reseller markup and no setup fee. Low MOQs let you test a size before you scale. Send a rival quote through Beat My Quote and we will try to come in lower.
- Request a free quote. Share the size, the style, the print, and the count.
- Get a free proof. Our team preps a dieline and a 3D mockup at no cost.
- Approve and we print. We build factory-direct after sign-off.
- Free US delivery. Your boxes ship to your door in 10 to 12 days.
Explore More
- How to Measure Packaging Dimensions — measuring 101.
- Product Packaging Dimensions — beginner guide.
- Standard Packaging Box Dimensions — by industry.
- Retail Packaging Size Guide — shelf sizes.
- Beat My Quote — free dieline + proof.
Frequently Asked Questions
What is bleed on a packaging dieline?
Bleed is 1/8 inch of print past every cut edge, in case the die shifts 1/32 in during production. Without bleed, a small die shift leaves a white edge on the finished box. Always extend background colors to the bleed line.
What is a safe zone on packaging?
A safe zone is 1/4 inch inside every fold, where text and key art stay clear of the crease. Ignoring the safe zone hides text on the fold or across the crease. Keep bold text and brand marks inside the safe zone on every panel.
How much resolution do I need for packaging print?
All raster art (photos, textures) needs 300 DPI minimum at print size. Vector art (logos, icons) prints crisp at any size since it scales without loss. Convert all colors from RGB to CMYK before export to avoid on-press color shift.
Where should the UPC go on a box?
Reserve a 1.5 by 1 inch panel on a back or side face, never on a fold. Keep 1/8 in quiet zone on all sides of the barcode. Put ingredient lists, warnings, and net weight nearby on the same or adjacent panel.
What file format do I send to a packaging printer?
Send a press-ready PDF with fonts embedded, bleed included, and crop marks on. Include the dieline as a spot color layer that prints suppress at press. A JPG preview helps the print team visually confirm before ink hits paper.
Can I use RGB colors on packaging?
No. RGB colors shift when converted to CMYK on press. Always design and export in CMYK for print. For brand-critical colors like a red logo, spec a Pantone match number so the print supplier hits the exact color across every run.
What price can I expect for custom packaging design dimensions in bulk?
Wholesale custom packaging design dimensions start from about $0.10 per unit at Discount Box Printing, with the final price set by size, board thickness, print color count, and run size. Larger orders cut the per-unit cost by a wide margin, and you can send a competing quote to our <a href="/beat-my-quote">Beat My Quote</a> page to lock in a better rate.
What is the minimum order quantity for custom packaging design dimensions?
We print custom packaging design dimensions with a low minimum order so small brands and new product lines can start without a big spend. Low MOQs let you test art and sizes on the shelf before you scale up, and when you reorder in bulk the per-unit price drops. Reach out for the exact MOQ on your spec.
How long does it take to print and deliver custom packaging design dimensions?
Standard turnaround on custom packaging design dimensions is about 10 to 12 business days after proof approval, with a 6 to 8 day rush option on most jobs. Timing starts once art and dieline are signed off, so a fast proof reply keeps the clock short. Free US ground shipping is included on every order.
Do you offer free design, a dieline, and a 3D mockup for custom packaging design dimensions?
Yes. Every custom packaging design dimensions order at Discount Box Printing includes free design help, a print-ready dieline, and a 3D mockup before we go to press. Our team cleans up logos, sets bleeds, and checks food-safe inks when needed, so the box you approve on screen is the box you receive at your door.
Do you ship custom packaging design dimensions across the United States?
Yes. We make custom packaging design dimensions factory-direct and ship to every state in the US with free ground freight on wholesale orders. Our team at Discount Box Printing coordinates print, cut, and dispatch under one roof, so your boxes land on time whether you order from New York, Texas, California, or anywhere between.
Ready to order your custom boxes?
Free design, low minimums, fast turnaround — at wholesale prices.
Get a Free Quote
Related Posts
Rigid Box Dimensions for Luxury Product Packaging
Product Packaging Dimensions Explained for Beginners